


Horizon Imaging were recently asked by the DIGIT magazine (a magazine run by the Royal Photographic Society specialising in Digital Imaging) to write an article on my experience with drone technology and we were delighted to accept! You can read the full article as well as see larger versions of the images featured in the article below:
Drones – affordable and flexible eyes in the sky
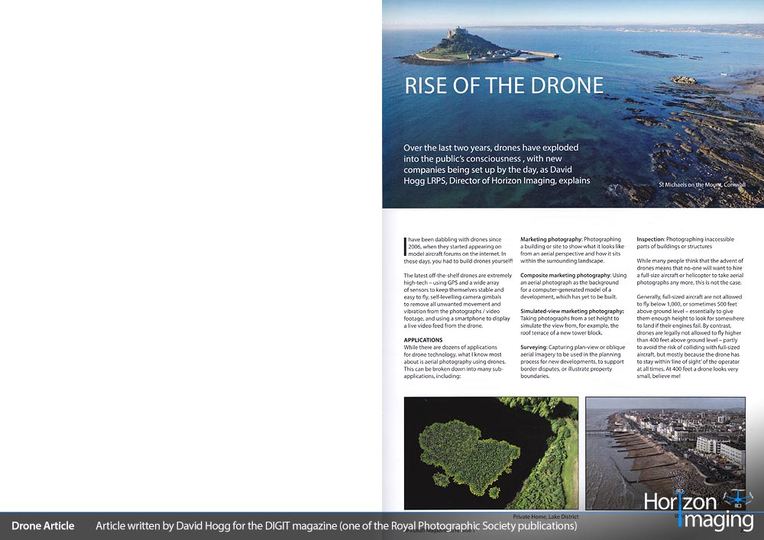
Over the last 2 years, drones have exploded into the public’s consciousness, and there are new companies being set up by the day, offering an ever-increasing range of services using these airborne marvels of technology.
My name is David Hogg, and I have been running my own full-time photography company, Horizon Imaging, since April 2014. My main area of specialism is aerial photography and videography using drones, but I also offer telescopic mast photography (for those areas where the drone cannot be flown), architectural photography (for ground-level internal and external work), virtual tours and video production. For more information, please visit my website at: www.horizonimaging.co.uk
I have been dabbling with ‘drones’ since about 2006 when they first started appearing on model aircraft forums on the internet – in the days where to own a drone, you had to build it yourself! Starting out as manually-flown radio-controlled model aircraft with cameras hastily strapped to them, the latest off-the-shelf drones are extremely high-tech – using GPS and a wide array of sensors to keep themselves stable (making them easy to fly), self-levelling camera gimbals to remove all unwanted movement and vibration from the photographs / video footage, and utilising something many people have in their pockets to display a live video feed from the drone – a smartphone!

David Hogg’s article on aerial photography in the first 2016 issue of the DIGIT magazine, published by the Photographic Society. Click each image to enlarge.
APPLICATIONS
Whilst there are dozens of applications for drone technology, this article will concentrate on what I know most about – aerial photography using drones. This in itself can be broken down into many sub-applications, including:
– Pure marketing photography – photographing a building or site to show what it looks like from an aerial perspective, and how it sits within the surrounding landscape.
– Composite marketing photography – using an aerial photograph as the background for a computer-generated model of a development which has yet to be built.
– Simulated-view marketing photography – taking photographs from a certain height to simulate the view from, for example, the roof terrace of a new tower block.
– Surveying – capturing plan-view or oblique aerial imagery to be used in the planning process for new developments, to support border disputes or illustrate property boundaries.
– Inspection – photographing inaccessible parts of buildings or structures
Whilst many people think that the advent of drones means that no-one will want to hire a full-size aircraft or helicopter to take aerial photographs any more, this is certainly not the case. Generally, full size aircraft are not allowed to fly below 1,000 (or sometimes 500) feet above ground level – essentially to give them enough height to look for somewhere to land if their engines failed. By contrast, drones are legally not allowed to fly higher than 400 feet above ground level – partly to avoid the risk of colliding with full-size aircraft, but mostly because the drone has to stay within ‘line of sight’ of the operator at all times, and at 400 feet a drone looks very small, believe me!
So in reality, drones and full-size aircraft are serving two totally different markets. Photographs taken from full-size aircraft are great for capturing very large areas of land at a time, and full-size aircraft can safely fly over built-up areas, large crowds of people, busy roads and railway lines. Their downside is that imagery captured from so high up often looks very 2-Dimensional and flat, particularly if you have zoomed into a building of interest with a long focal length lens.
By contrast, drones can fly anywhere between ground level and 400 feet, so you can fly much closer to your subject, and capture the subject, the surrounding countryside and the horizon all in one photograph. It’s for this reason that, in my opinion, drone aerial photographs have a much greater sense of depth, perspective and intimacy with their subjects than photographs taken from full-size aircraft. However (and it’s a big ‘however’), there are strict regulations which govern where drones can and cannot be flown, and this is something I will touch on later in this article.
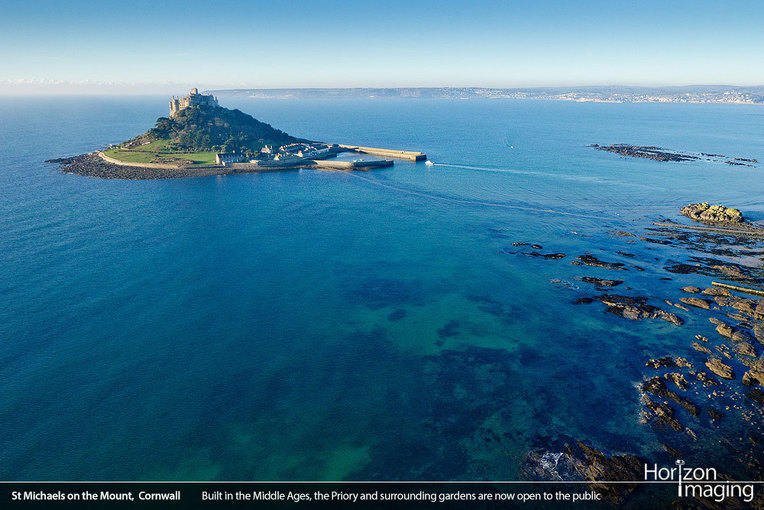
St Michael’s Mount, Marazion, Cornwall, taken in January 2011 with a Canon EOS 550D with a Canon 10-22mm lens.
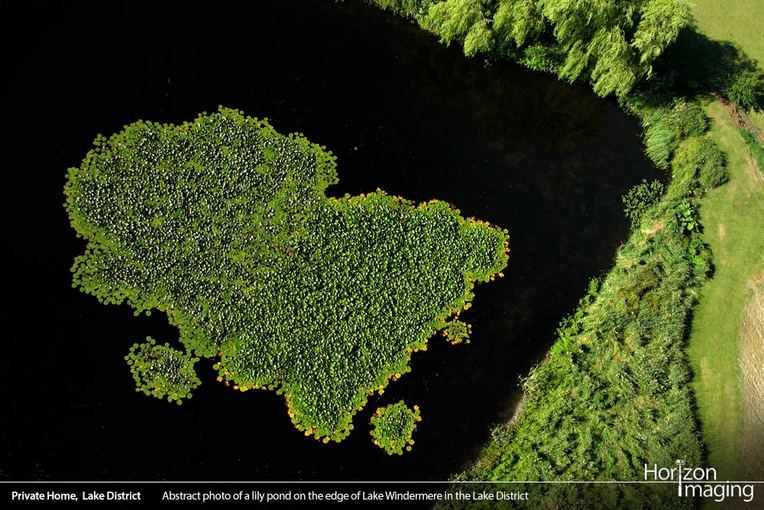
Abstract aerial photograph of a lily pond in the Lake District, taken in July 2006 with a Canon Powershot A620.
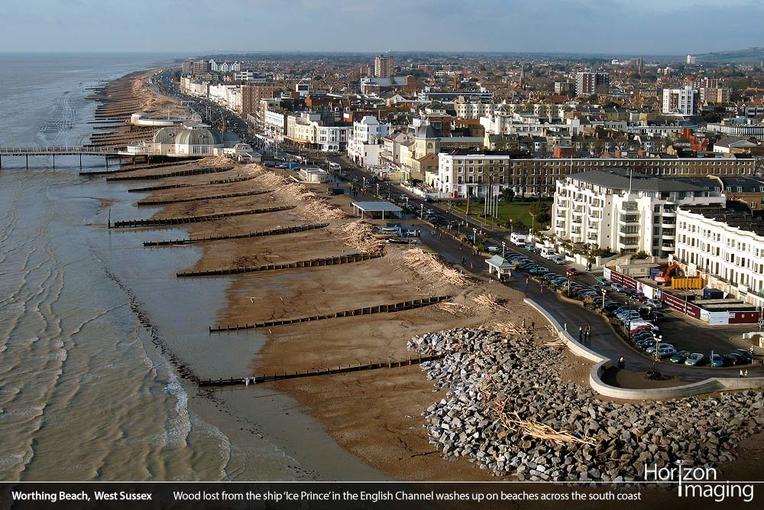
Piles of wood washed up on Worthing Beach, West Sussex, taken in January 2008 with a Canon Powershot A620.
DRONE DESIGN
Technicalities wise, most drones tend to look much the same these days. They all tend to have:
– An even number of motors – no less than 4, and if you have 6 or more, a motor can fail and you can still maintain control of the drone.
– A central hub where the drone’s brain / flight control electronics lives.
– An equal number of clockwise and anti-clockwise rotating propellers. If they all rotated in the same direction the drone would spin uncontrollably in the opposite direction – by having equal numbers of clockwise and anti-clockwise propellers, their torques cancel out.
– One or two Lithium-Polymer (‘LiPo’) battery packs powering the motors, and sometimes another battery powering additional components.
– A 2 or 3-axis camera gimbal which uses sensors and motors to keep the camera level no matter how the drone moves around it (although some simpler drones just have a fixed camera mount)
– Either fixed or retractable landing gear which keeps the drone away from the dust and dirt when landing and taking off from the ground.
Many of the more advanced drones now use GPS position hold technology to make them easier to fly. This basically means that if you don’t touch the control sticks whilst the drone is in the air, it will hover there all by itself, maintaining the same height and position in space until you tell it to do otherwise! This has been further expanded by some manufacturers who have implemented waypoint following features which allow you to use a Google Maps style interface on a smartphone or tablet to tell the drone exactly where to fly – you simply tap on a location on the map and the drone will fly there all by itself! Some drones even have a return-to-home button on their control handset too!
Most drones are designed to carry a particular range of payloads or cameras. The heavier the payload, the more batteries you have to carry to give a reasonable flight time, and the larger the frame, motors and propellers need to be to handle the additional weight. But that’s the beauty of the multi-rotor drone design which is so ubiquitous these days – if you need to carry a bigger camera you can just scale everything up and the mechanics and aerodynamics still work.
Typically the batteries weigh between 20 to 30% of the total weight of the drone, and this is based on achieving a flight time of about 10 to 20 minutes. Whilst this might sound quite short, it is actually plenty for taking aerial photographs from a number of different angles, and when one battery is depleted you can simply land, fit a fresh battery and take-off again immediately. Although it is possible to make a drone fly longer by fitting more batteries, you are then carrying more weight too! So adding a second battery will not give you twice the flight time, but perhaps only 60% more. The aspect of a shoot which uses the most flight time is when the client changes their mind about what angles they want once the drone is airborne! So for this reason it pays to plan ahead as much as possible whilst the drone is still on the ground – deciding exactly how the client wants their subject composed in the final images, what they want in the background, and so on.
Drones can generally fly in winds of no more than 15-20 mph, as above this speed the flight control and gimbal electronics will start to struggle to keep the drone stable. That said, the heavier the drone the better it will cope with strong winds, and some larger drones can still be flown in winds of up to 25-30 mph.
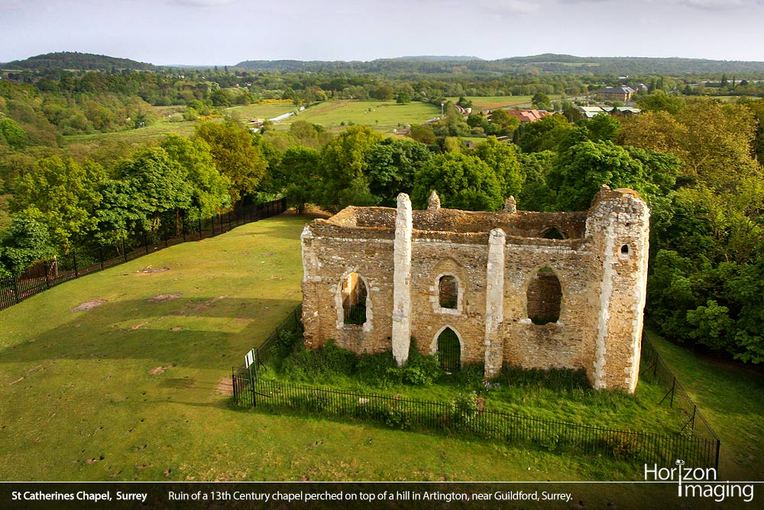
St Catherines Chapel in Guildford, Surrey, taken in May 2009 with a Canon EOS 550D with a Canon 10-22mm lens.
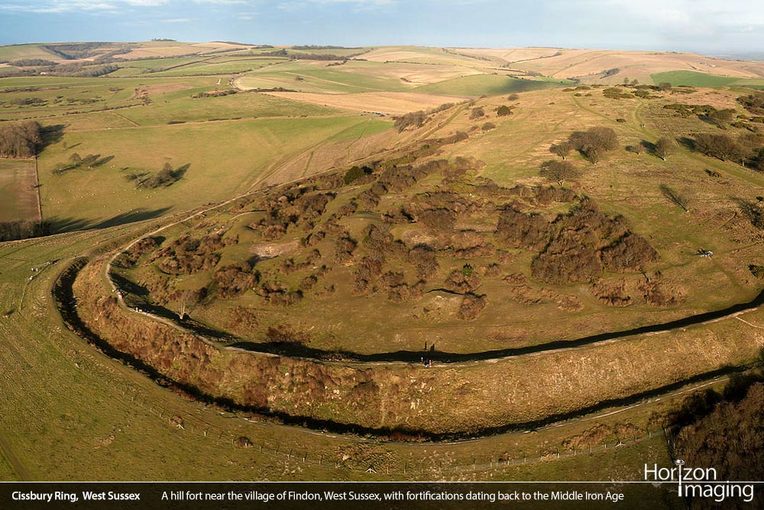
Cissbury Ring in West Sussex, taken in January 2008 with a Canon Powershot A620.

Jill Windmill in West Sussex, taken in July 2008 with a Canon Powershot A620.
CAMERA CHOICE AND POST-PROCESSING
The drone I am pictured with is my own design and construction and it carries a Sony Alpha A5100 compact system camera. I absolutely love this camera … it has a high resolution 24 megapixel 1.5x crop sensor (so, 1.5 times smaller than a full-frame 35mm sensor), no mirror or penta-prism to add unnecessary weight, a fast 6 frames-per-second burst mode, RAW image capture, and it supports a wide array of interchangeable lenses. I use Sony’s 10-18mm f/4 ultra wide-angle zoom lens (15-27mm equivalent on a 35mm sensor) which resolves detail onto the 24 megapixel sensor extremely well. Together with the A5100 camera body, this incredible combination weighs just 555g – less than most digital SLR camera bodies.
Over the years I have found the following camera settings yield the best aerial photographs: manual focus set to ‘infinity’ (I always manually focus the lens on a distant object rather than relying on the lens’ interpretation of ‘infinity’ focus), Shutter Priority mode set to 1/400s or so, an ISO manually set to make the lens stop down to around f/5.6 or f/6.3, and image stabilisation switched off (stabilised lenses are designed to correct for low frequency vibrations caused by handshake – the mechanics cannot handle the high frequency vibrations onboard a drone, and leaving it switched on can actually make motion blur worse!). I also tend to use a circular polariser on every flight as it helps to deepen the blue of the sky (provided you are not looking directly towards or away from the sun where it has no effect) and it reduces the reflections from grass and leaves too, making them appear more deeply coloured. The only down side is that the polariser reduces the amount of light that reaches the sensor, so I will often need to shoot at around ISO 320 or 400 to maintain the fast shutter speed.
Once I’ve taken the photographs, I will firstly sift through them and mark the sharpest images in Adobe Bridge before taking them into Adobe Lightroom to do the processing. My processing is quite straight forward and generally involves levelling the horizon, applying graduated filters to the images to even up the brightness (particularly if the sun was off to one side of an image), reducing the highlights, boosting the shadows and reducing the saturation of the greens and blues which often get overcooked as a result of the rest of the processing adjustments. If I need to make more specific adjustments (advanced cloning, healing and colour adjustments) then I will take the images into Adobe Photoshop.

Leith Hill tower near Dorking, Surrey, taken in June 2010 with a Canon EOS 550D with a Canon 10-22mm lens

Luttrells Tower in Southampton, Hampshire, taken in February 2008 with a Canon Powershot A620.
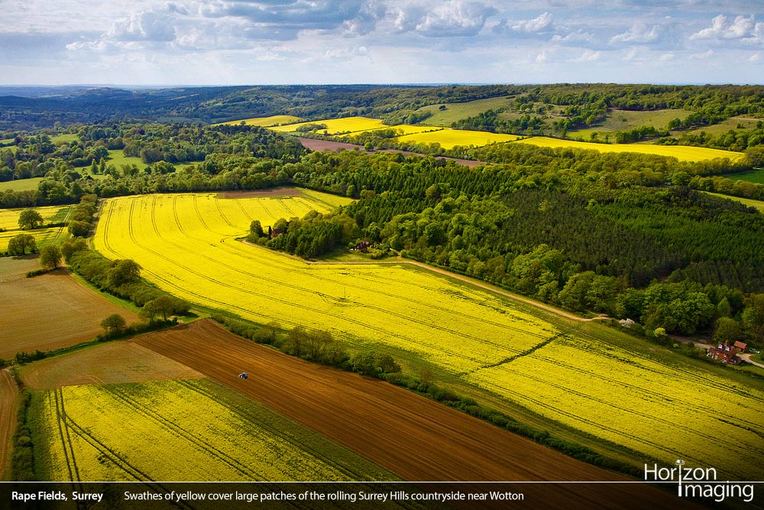
Rape fields near Abinger Hammer, Surrey, taken in May 2010 with a Canon 550D with a Canon 10-22mm lens.
HAVING A GO YOURSELF
There are literally hundreds of different drones out there these days, and you can spend from as little as £30 to several thousand pounds depending on how serious you are in having a go. The manufacturer that has been around the longest and has some of the most advanced platforms on the market is DJI. Their white ‘Phantom’ drone has become a best-seller and is probably the most well-known consumer drone on the planet. The latest mark-3 Phantom starts at about £650, features a fully-stabilised 12 megapixel camera which can take 2.7K HD video, and connects directly to a smartphone or tablet via WiFi to provide you with a live video feed.
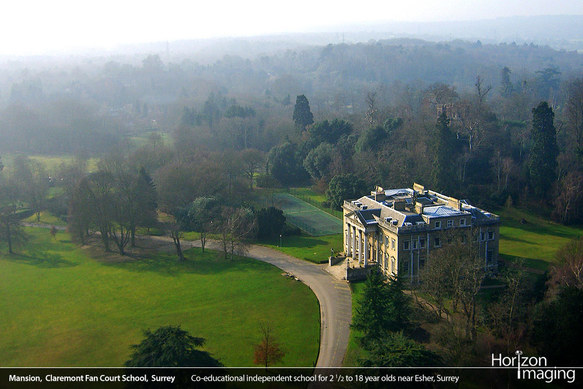
Claremont Fan Court School, Esher, Surrey, taken in February 2006 with a Casio EX-Z750.
Unfortunately I am not familiar with drones cheaper than the Phantom, but suffice to say, you do get what you pay for! Cheaper drones are likely to be less well built, have fewer features, and use lower quality cameras and gimbals. However, if you are not keen to spend so much money on your first drone, it’s best to seek the advice of other radio-control modellers on a forum like RCGroups.com to see which of the current crop of cheaper drones are worth trying: www.rcgroups.com/aerial-photography-128/
LEGALITIES AND REGULATIONS
The Air Navigation Order (search for CAP 393 on Google), written by the UK Civil Aviation Authority (CAA), lists clear regulations governing how model aircraft are to be flown. Sections 138, 166 and 167 are particularly pertinent for small models like the Phantom which are fitted with a camera – turning them into ‘Small Unmanned Surveillance Aircraft’.
At the end of the day, common sense should prevail when flying any type of model aircraft. Unfortunately, the internet is littered with videos taken from models like the Phantom as they are flown over crowds of people, over busy roads and up to heights where full-size aircraft are likely to be operating. It would only take a propeller to come loose or a motor to fail for a model to fall straight down on whatever, or whoever is beneath them, potentially causing serious injury. Near misses with commercial helicopters and airliners have also been reported – the consequences of an air-to-air collision do not bear thinking about. Some countries like France, Spain and the US have simply enforced an outright ban on flying any type of model aircraft with a camera fitted to it, although in Spain and the US it is only illegal at the moment if you use the platforms for commercial gain.
Fortunately the UK CAA have taken a very pragmatic approach to regulating the use of “drones”, and provided you abide by the regulations in CAP 393, commercial operators and hobbyists alike can continue to enjoy the incredible applications of these incredible pieces of technology.
For the most up to date information, it’s best to go to the CAA directly via their website:
It is worth noting, that there are different regulations to follow depending on whether you use drones for commercial work. As soon as a drone is used for commercial gain (whether or not you get paid) you have to hold a ‘Permission for Aerial Work’ from the CAA. To apply for this Permission you need to provide evidence of:
– Pilot competence (which can be achieved through attending a training course provided by companies such as Resource UAS)
– Adequate Public Liability Insurance cover (at least £5M), and
– An Operations manual, including maintenance schedules and a sample Risk Assessment
More details about becoming a licensed commercial drone operator can be found on the website above.
SUMMARY
I hope this article has given you an interesting insight into the world of drones, and how I am using them to offer unique aerial views to my clients. If you have any questions or would like more information on drones, please do get in touch with me via my website: www.horizonimaging.co.uk
David Hogg, Director, Horizon Imaging
As a visiting speaker at many local camera clubs, I am always looking for new opportunities to share my love of digital, and particularly aerial photography with a wider audience. If you know of any local clubs or societies that would be interested in having a presentation from me, or indeed any magazines looking to publish an article on drones, please do pass my contact details onto them. Thank you!